Prerequisites
Aside from using Debian Linux, this method will only work on “Core” or “Core 2” series intel processors. This includes variants such as “Core/Core 2 solo, duo, quad” etc.
If you are looking for a possible alternative for intel i series processors, I suggest looking at p-states.
Introduction
Undervolting is a process done in order to either reduce power consumption or reduce heat emmision from the processor. As far as I know, performance is not affected by this process. The processor can actually function in a stable manner (with the same clock speed)
My system
As of this writing, I have tested this method myself on my system. Specs are:
- Thinkpad X61
- RAM: 2GB
- Processor: Intel(R) Core(TM)2 Duo CPU T7500 @ 2.20GHz
- OS: Debian 9 (all updates current as of this writing)
A note on VIDs (formats)
One thing that first made me confused when looking at this process is how VIDs or “Voltage IDs” are written. You can see several formats online that range from “19 4 4” to “2600:40 2200:45 1600:38 1200:35 800:30”.
The numbers
The numbers represent the voltage id. The lowest value is 0. IDK what the highest value is. A VID of zero is the lowest voltage id that the system supports.
The amount of numbers
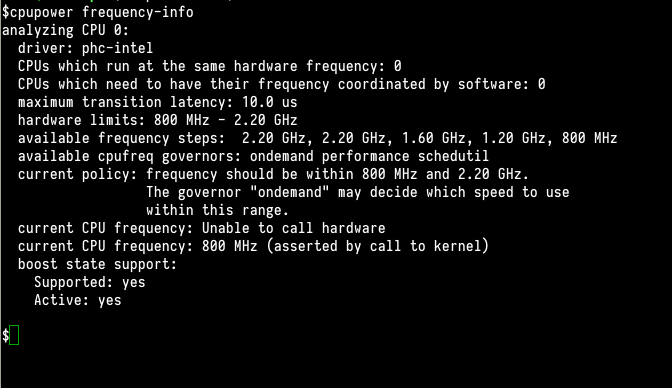
The amount of numbers vary by the number of available frequency “steps” available on your system. For example, my computer can do 2.2Ghz, 2.2Ghz, 1.6Ghz, 1.2Ghz and 800Mhz. This means that I have 5 numbers for the VIDs. (the duplicate one is probably for “boost”) To find out the number of steps on your processor, use the command: “cpupower frequency-info”
Formats
As you can probably figure out by now, the format that goes like this: “19 4 4” are just the plain voltage ids. The format that goes like this: “2600:40 2200:45 1600:38 1200:35 800:3” is the processor frequency (in MHz) followed by the corresponding VID for that frequency step.
Step 1: Downloading
intel_phc is a kernel module. You will need to download and install the module yourself. As of this writing, this is the download link: put link here
Step 2: Extraction
Extract the files from the archive into its own folder
Step 3: Installation
There are installation instructions already included in the README.1st file There are 3 installation methods available. It is ranked here from most ideal to “fuck it”
Method 1
make dkms_mkdebThis method generates a deb package for you. Please install it afterwards. This is ideal since it utilizes your package management system. It also has the added benefit of automatically installing when you upgrade your kernel with dkms. /This method did not work for me./ :(
Method 2
make dkms_installIts like method one, but it automatically installs after it generates the deb file. /This method also did not work for me/
Method 3
make
make installCongratulations! You have installed intel_phc!
Configuration
Manual
VIDs are set per core. In my case I have a dual core processor (you probably have one too). VIDs are set here: (read and write here to get and set)
/sys/devices/system/cpu/cpu0/cpufreq/phc_vids
/sys/devices/system/cpu/cpu1/cpufreq/phc_vids
Sample output format:
$ cat /sys/devices/system/cpu/cpu0/cpufreq/phc_vids
33 30 5 3 1
$ cat /sys/devices/system/cpu/cpu1/cpufreq/phc_vids
33 30 5 3 1
Automatic (via tlp)
I use TLP to automatically set VIDs. Default config location: /etc/default/tlp Look for the line that says:
# Change CPU voltages aka "undervolting" - Kernel with PHC patch required
# Frequency voltage pairs are written to:
#   /sys/devices/system/cpu/cpu0/cpufreq/phc_controls
# CAUTION: only use this, if you thoroughly understand what you are doing!
PHC_CONTROLS="12:33 11:30 8:5 6:3 136:1"+++ Undervolting
/sys/devices/system/cpu/cpu0/cpufreq/phc_controls = 12:33 11:30 8:5 6:3 136:1
/sys/devices/system/cpu/cpu0/cpufreq/phc_default_controls = 12:47 11:43 8:31 6:23 136:15
/sys/devices/system/cpu/cpu1/cpufreq/phc_controls = 12:33 11:30 8:5 6:3 136:1
/sys/devices/system/cpu/cpu1/cpufreq/phc_default_controls = 12:47 11:43 8:31 6:23 136:15 This portion of the output will give you the value pairs. In my case, the defaults are: “12:47 11:43 8:31 6:23 136:15”. The number after the colon is the VID. That is what needs to be changed.
Finding stable VIDs (“how low can you go?”)
Now that we know know to install and configure intel_phc, how do I know what numbers to put in? The process outline here is one that I have formulated on my own after looking at the available methods online. I have went this route because the autoconfiguration scripts that I have found have dead links.
My method involves using mprime to stress the cpu while adjusting the values. This involves tuning the VIDs from the default values. What you will need to do is manually edit the VID values file for each core of the CPU. You need to start with the highest number that corresponds to the highest frequency (more about forcing the CPU to run at a certain frequency step later). Then, slowly progress downwards towards the lowest frequency. Tuning involves lowering the VID number until the system crashes. The last VID that you have tested that works is the lowest VID you can set (I personally don’t go for the lowest for the sake of system stability).
- Manually set processor frequency
- Run mprime
- Continuosly lower the values. Once you lower the value, wait about one minute to test if the system is stable under load. If it passes, lower the value by one. /the system will crash. please remember the last stable values and move on to the next lowest frequency/
Forcing the processor to run at a certain step
sudo cpupower frequency-set -f 800MHzConclusion
When I tried this on my computer, I had very satisfying results. According to powertop, my power consumption with bluetooth and wifi off ,20% screen brightness and under light load(typing this with firefox open) gives me about 9.3W of power usage. Battery discharge time estimates from the system report 46% with 1h 41m remaining until empty (using the 4 cell battery). With a stock Windows XP installation, it takes 2h to empty the battery (same load conditions). With tlp and undervolting, it now takes 3 hours to discharge.